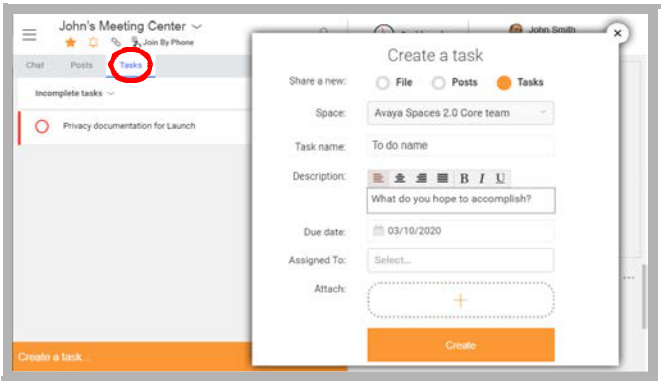
Avaya Spaces Quick Start Guide I. LOGGING IN Avaya SpacesTM operates entirely within the Chrome web browser. No software is required. Go to https://accounts.zang.io/ • For corporate users, your administrator will have setup your account using your company credentials (i.e. Windows, Salesforce, Office365, Google or a Corporate SSO). Enter your email address, then click the appropriate method and follow the on-screen instructions to login. • Individual users will have to create an account first. Enter your email address, then click Yes, Sign me Up! You will receive a confirmation email. Use the link in the email to confirm your account creation. When prompted, enter any additional requested information and a password. • Avaya Spaces will launch at the program dashboard. • On all future logins, entering https://spaces.avayacloud.com into the Chrome address bar will bring you to the dashboard directly without the need to login again. You will only need to enter your credentials if you logout of Spaces. II. LET’S GET STARTED 1.Create a New Space Click New Space or use the button to create a new hub for your next project team. Give your new Space a name. Enter the name or email address for all of the people you want to add. Assign each to the Admin, Member, or Guest category. Click Save when your Space is complete. It will appear in the Recent Spaces pane on the left side of the screen. Click on any Space to launch. 2. My Meeting Room The My Meeting Room button opens a Space where you can invite people to join you. This room functions like any other Space, but everyone that you invite can only have Guest privileges. III. INVITING PEOPLE Enter the Space, click Invite People, and start typing. Enter the email addresses of the contacts you want to add. Specify if they will be an Admin, Member, or a Guest. Copy Link: For contacts that cannot be reached by other means, click Copy link and paste it into an email to the contact. When they click the link, they will join the meeting as a guest. Once your list of invitees is complete, click Invite to send the invitations and launch the meeting.Assigning Rights For each person you add to the Space, you must specify each as either Admin, Member or Guest. By default, invitees are Members. • Guest: Only have access to the Messages tab. Past messages, Tasks and Posts are not visible. • Member: Can view all tabs and message history. • Admin: These are members who can also add and remove people from the Space. IV. STARTING A MEETING Clicking on any Space in Recent Spaces, or selecting My Meeting Room, will launch that Space in the main window.Use the main panel to conduct chat sessions with all those invitees that have Spaces open. Launching a Video Conference The video panel is in the top right-hand corner of each Space. Click in the video window. Your webcam and microphone will activate and the conference will begin. Everyone who is part of the Space, and who has the Space open, will see the video call pane change. They can click the pane to join the call. The video conference is in session. V. TEXT MESSAGING Person-to-Person: To send a text message to a single individual, click their name in your Direct Messages pane. This opens a chat window with that person. Enter your message and click Send Group: To send a message to everyone that is part of a Space, open the Space, go to the Chat tab and type a message at the bottom of the window. Click Send The person you are texting, or everyone in the Space will receive the message the next time they login to Spaces. If they have notifications enabled, a pop-up will appear on their screen in the lower right corner of their Windows desktop (unless they have logged out of Spaces). Notifications Toggle Notifications On / Off through the User Preferences menu. Turn off Disable all notifications. With this switch turned off, users of Spaces will receive pop-up notifications whenever they receive a text message as long as they are logged in. Space does not have to be opened for this to happen. If this switch is turned on, or if the user has logged out of Spaces, they will not receive notifications until they log in to Spaces again. VI. THE TABS Once you have entered a Space (but before launching a video call), there are 3 tabs in the main window. Members and Admins of the Space can see the entire history for the Space. Guests to the Space can only see text messaging that are sent while they are present, and have no access to Posts or Tasks. Chat: The Chat tab shows all of the text messages directed at the group: person-to-person messages are not shown here. Type a message at the bottom of the window and hit Send. Everyone in the meeting will see the message. Anyone not in the meeting will receive a notification that they have a message waiting. Posts: Use the Posts tab to share files with the other members of the Space. Items uploaded here remain a permanent part of the Space, remaining available for as long as needed. Tasks: When managing a team, use the Tasks tab to assign people to projects and set deadlines. Scheduled tasks, completed tasks, and overdue tasks are all displayed here.Contact Support: +8498 5153383 - +8406 5132195Email: support@starviewint.asia